Create New ARB Subscription
The Create New ARB Subscription page allows you to create and initiate recurring credit card or eCheck.Net® transactions. To create a new ARB subscription, provide payment, order, subscription, customer billing, and shipping information. Fields with an asterisk (*) are required in order to create the subscription.
To create a new ARB subscription:
Step 1: Select a Payment Method
Select one of the payment methods available.
Note: The payment processing associations that regulate electronic check transactions require that you have the appropriate authorization from the customer to submit a recurring eCheck.Net transaction to the payment gateway.
Step 2: Enter the Payment/Authorization Information
Enter the customer’s credit card or bank account information and the recurring amount.
For credit card transactions:
-
Card Number—The number associated with a cardholder account.
-
Expiration Date—The month and year a credit card expires. This number is fully masked by the payment gateway.
-
Amount—The recurring amount to be charged to the customer's credit card or bank account.
For bank account transactions:
-
Name on Account—The full name of the person or business associated with the bank account.
-
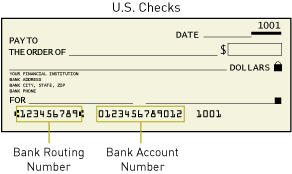
ABA Routing Number—The ABA Routing Number is a nine-digit number that identifies the financial institution associated with a bank account. This number is located at the bottom left corner of a check.
-
Account Number—The account number associated with a savings or checking account at a financial institution. The checking account number is located at the bottom of a check.
-
Bank Account Type—The type of bank account associated with the account number: Checking, Business Checking, or Savings.
-
eCheck.Net Type—The type of eCheck.Net transaction. For a list of transaction types, see the topic eCheck.Net Type
-
Bank Name—The name of the bank or financial institution where the customer's bank account is located.
-
Amount—The total amount of a payment or transaction, inclusive of sales tax, freight, shipping and/or duty.
Step 3: Enter the Order Information
If desired, enter specific information associated with the subscription.
-
Subscription Name—The merchant-assigned name for a subscription.
-
Invoice Number—The merchant-assigned invoice number associated with the subscription.
-
Description—A description of the goods or services provided for the subscription.
Note: It is recommended that you enter either a Subscription Name or Invoice Number to easily differentiate between multiple subscriptions for the same customer. Otherwise, the payment gateway might reject the new subscription as a duplicate.
Step 4: Select a Subscription Interval
Click the radio button next to the desired . The Subscription Interval determines how often the customer should be billed. Select either a month based interval OR enter an interval based on a set number of days.
-
Every month
-
Every other month
-
Every three months
-
Every six months
-
Every twelve months
Note: Use the Days option for subscriptions with short intervals only. If the number of days you need to enter is greater than 30, consider using a Months option instead.
For each recurring transaction, the payment gateway will process the transaction within a 24-hour period of the scheduled day. However, the transaction might not always be generated and submitted before your configured transaction cut-off time. In this event, the recurring transaction will be processed and settled with the next batch of transactions.
Step 5: Enter a Subscription Duration
The Start Date establishes when the subscription should start. To indicate when the subscription should end, you must enter either an End Date or indicate the total number of billing occurrences for the subscription in Ends After. To ensure the information entered so far is correct, the payment gateway then automatically populates the remaining field. If the automatically populated End Date or Ends After number does not match the information provided to you by the customer, then go back to ensure the Subscription Interval, Start Date, and End Date or Ends After number are correct. For subscriptions with no specific End Date, you can also select No End Date to create an ongoing subscription.
-
Start Date—The date that the payment gateway will first charge the customer's account (cannot be in the past).
Note: Subscriptions with a Start Date of either the 30th or 31st and have a monthly subscription interval will be processed on the last day of the month for those months with less than 30 or 31 days.
-
End Date—The date the subscription ends.
-
Ends After—The total number of transactions charged for the subscription. This number should include trial billing occurrences, if applicable.
-
No End Date—Indicates the subscription is an ongoing subscription with no set end date.
Step 6: Enter a Trial Period
If desired, enter an initial for the subscription. Enter the Trial Amount that should be billed for each Trial Period billing occurrence and the number of billings that should be included in the Trial Period.
-
Trial Amount—The special transaction amount to be billed to the customer for the trial billing occurrences of a subscription.
-
Trial Occurrences—The number of billing occurrences during the trial period of a subscription. For example, if you wanted to implement a three-month trial period for a subscription that is billed once a month, this number would be "3".�
Note: Trial period information can be edited only if the subscription has not yet begun, or the subscription is still within the trial period.
Step 7: Enter the Customer Billing Information
If desired, enter the customer's billing information. Fields in this section include: , First Name, Last Name, Company, Address, City, State/Province, ZIP Code, Country, Phone Number, Fax Number, and Email Address.
Step 8: Enter the Customer Shipping Information
If desired, enter the customer’s shipping information. Fields in this section include: First Name, Last Name, Company, Address, City, State/Province, ZIP Code, and Country.
Note: If the shipping information is the same as the customer billing information, click the check box labeled Same as information entered in Billing Information.
Step 9: Click Submit to continue or click Reset to clear the subscription form and start over. The Subscription Confirmation page opens.
To view detailed information for the new subscription, click on the Subscription ID. The ARB Subscription Detail page opens.
To create another new subscription, click Enter a New Subscription.
